Overlanding Gear List for Beginners — What to Bring on Your First Trip
Overlanding gear has gotten complicated with all the sponsored YouTube builds and gear-flex forum threads flying around. As someone who buried a Tacoma to the frame in soft sand outside Moab six weeks into my first season, I learned everything there is to know about what actually matters — and what order to buy it in. My mistake was classic beginner stuff: two weekends of research, a $400 rooftop cargo basket, a Stanley cookware set, and zero recovery gear. Nobody around for miles that day. Four hours digging with my hands and a collapsed trekking pole. Don’t make my mistake. This guide is organized by genuine priority — reason first, gear second — so your money lands in the right places.
This article includes affiliate links. We may earn a commission at no extra cost to you.
What Overlanding Actually Requires — Why Car Camping Gear Is Not Enough
Car camping and overlanding pull from the same aesthetic — outdoor cooking, sleeping under stars, escaping pavement — but the operational reality is completely different. Car camping assumes a maintained road to a designated site. Overlanding assumes forest two-tracks, BLM roads, and unmaintained routes where cell coverage disappears, road surfaces change without warning, and the nearest help is an unknown number of miles behind you.
Four realities define what overlanding gear actually needs to address:
- Vehicle recovery — Push into genuinely interesting terrain and you will eventually get stuck. Sand, mud, loose rock, steep off-camber descents. Not maybe. Eventually.
- Navigation without cell service — Coverage disappears within two or three miles on most USFS and BLM roads. Your Google Maps cache is not reliable. You need offline maps running in airplane mode, or a dedicated GPS device.
- Extended range planning for fuel and water — Remote routes can stretch 80 to 150 miles between fuel stops. Water sources marked on maps are not always flowing. You plan for gaps.
- 12V power management — Phones, GPS units, headlamps, communication devices — all need charging over multiple nights away from shore power. A plan for that is gear, not an afterthought.
Probably should have opened with this section, honestly. Everything else — the camp chairs, the cast iron skillet, the rooftop tent — is downstream of one basic question: can you get unstuck, stay found, stay hydrated, and reach the outside world if something goes sideways? Do not buy comfort gear before you have recovery gear. That priority order is not a suggestion.
Vehicle Recovery — The Non-Negotiable Category
Getting stuck in a remote area without recovery gear isn’t just inconvenient — it’s genuinely dangerous when there’s no foot traffic, extreme temperatures, or limited daylight. This is where you spend first, full stop.
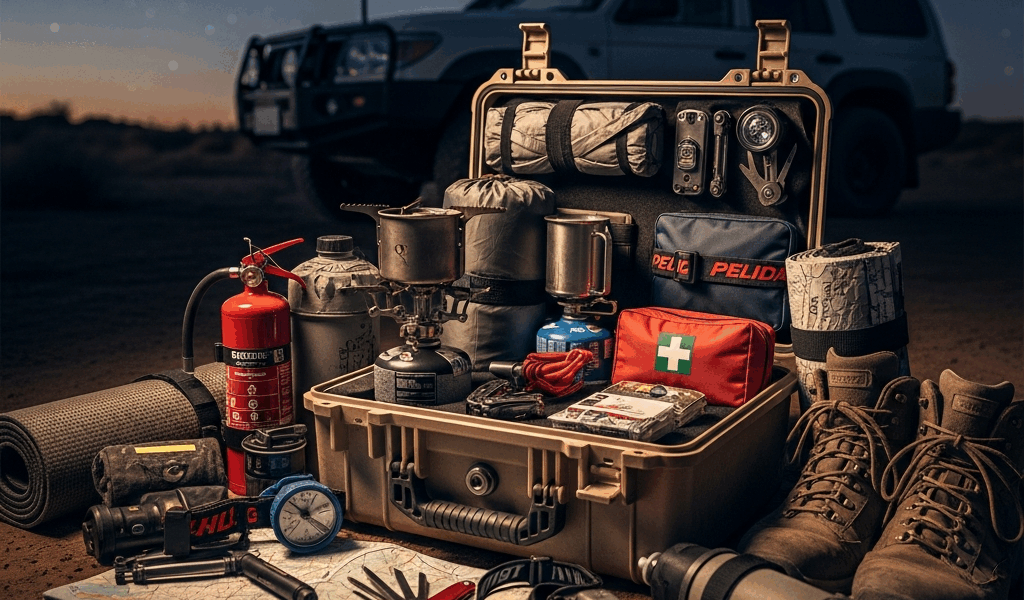
Tier 1 — Buy Before Your First Trip
Traction boards are the single most important recovery item for a beginner. But what are traction boards? In essence, they’re rigid textured ramps you slide under spinning tires to give them something to bite. But they’re much more than that — they’re the reason a solo stuck situation becomes a 25-minute inconvenience instead of an overnight emergency. Quality sets run two directions on price: Maxtrax MKII originals at roughly $350 a pair, or Chinese-manufactured knockoffs at $80 to $120. The technique is straightforward — dig out in front of or behind the spinning tires depending on direction of travel, slide the boards underneath, drive out. A clean extraction runs 20 to 30 minutes solo.
Maxtrax originals are genuinely better — more aggressive tread, better build quality. The knockoffs work, though. I’ve used both in actual stuck situations. If budget is tight, the knockoffs will serve a beginner fine on their first few trips. Upgrade when you can.
Humbled by that Moab afternoon, I ordered a set of Maxtrax MKII boards the week I got home — paid with money I’d originally earmarked for a camp kitchen upgrade. Drove back to that same BLM road three months later specifically to practice a self-recovery. Took 22 minutes. That is what the right gear feels like.
Tier 2 — Add When Budget Allows
Three items cover the scenarios traction boards alone can’t handle:
- Hi-Lift Jack (48-inch model, about $90) — Useful for lifting a tire out of a hole, shifting a vehicle sideways on a slope, or serving as a makeshift come-along. Heavy, slightly dangerous if you haven’t practiced with it, and absolutely worth owning by your third or fourth trip.
- Rated recovery strap (20 feet, 3-inch, 30,000-lb rating) — Not a tow strap — those are webbing with hooks and zero stretch. A kinetic recovery strap has elasticity built in, which lets a second vehicle build momentum and yank a stuck vehicle free without snapping anything or damaging either frame. Budget $60 to $80 for a quality one from Bubba Rope or ARB.
- D-shackles or bow shackles rated for your vehicle weight — These connect the recovery strap to your factory tow points or aftermarket recovery points. Get the rated ones — not the hardware store bin versions. A pair of ARB rated shackles runs about $35.
Those three items plus a second vehicle cover roughly 80% of recovery scenarios you’ll encounter in your first two years. The remaining 20% is what a winch is for — and you don’t need a winch on your first trip.
Navigation Without Cell Service
Cell coverage on forest roads ranges from unreliable to completely absent. This isn’t a carrier problem — it’s terrain and tower density, and no carrier is meaningfully better than another once you’re two ridgelines deep into a national forest. Planning your navigation around cell service is the wrong plan.
The Minimum Setup
Download Gaia GPS or onX Offroad before you leave home — both available on iOS and Android, both around $30 to $40 per year for the useful version. Download the full offline map package for your specific target region — not the general area, the specific forest or BLM district you’re actually driving into. Do this on WiFi. Download sizes run 200MB to 800MB depending on region.
Don’t rely on Google Maps cache. Google caches roads for navigation — not the full topo layer — and the cache behavior is inconsistent in ways you won’t discover until you’re already in the field. Gaia and onX are built for offline use by design. There is a meaningful difference, and you’ll feel it the first time coverage drops.
Better Than the Minimum
A dedicated handheld GPS might be the best option, as overlanding navigation requires reliability when your phone hits 4% battery at mile 30. That is because cold temperatures drain lithium batteries faster than normal use, and a long day combining GPS navigation, photography, and music will kill most phones within six hours. The Garmin eTrex 32x runs about $200 and takes AA batteries — the kind you can buy at any gas station on the way out. The Garmin Montana 700 handles larger maps and costs around $500. Either one keeps working when your phone is a dead rectangle in your cupholder.
One more step that costs nothing: print the Motor Vehicle Use Map for your specific national forest from fs.usda.gov — free PDF downloads organized by ranger district. Print it, fold it, put it in the glove box. It shows open roads by vehicle type, seasonal closures, designated camping areas. A paper map doesn’t lose GPS signal.
Camp Kitchen, Shelter, and Sleep
This is where most beginner overlanders overspend too early. Resist the rooftop tent until your third or fourth trip. Seriously.
Shelter and Sleep
Rooftop tents are genuinely convenient — setup in three minutes, sleeping off wet ground, off rocky ground, off whatever was crawling across the site at 10pm. Entry-level models like the Smittybilt Overlander at roughly $800 work fine. The better ones — CVT Mt. Rainier, Front Runner Roof Top Tent — run $1,200 to $2,000. That’s not a beginner purchase.
A quality 3-season ground tent in the $150 to $250 range handles your first several trips without compromise. The REI Half Dome 2 Plus at $199 is nearly indestructible. The Big Agnes Copper Spur at $250 packs smaller. Pair either one with a Therm-a-Rest NeoAir XTherm or Nemo Tensor sleeping pad — both around $180 to $220 — and you have a warm, functional sleep system that cost less than the cheapest rooftop tent on the market.
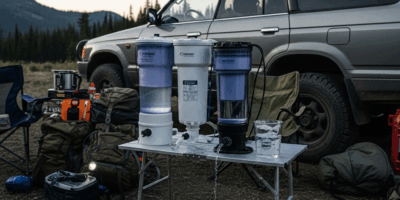
Water
Carry a 5-gallon water jerry can for transport — Wavian makes the standard NATO-style can for about $45, and it will outlast your vehicle. Add a Sawyer Squeeze filter at $35 or a Katadyn BeFree at $60 for emergency treatment from streams or stock tanks. The filter isn’t your primary water source. It’s backup insurance for trips that run longer than planned or sources that ran dry since the map was updated.
Camp Kitchen
A two-burner propane stove covers almost everything. The Coleman Classic at $65 is indestructible — it’s been on more overlanding trips than any boutique stove you’ll see on Instagram, runs on 1-pound propane canisters available at every hardware store and most gas stations. One canister lasts roughly 45 minutes of active cooking. Bring three for a weekend trip and you’re covered.
Power and Emergency Communication
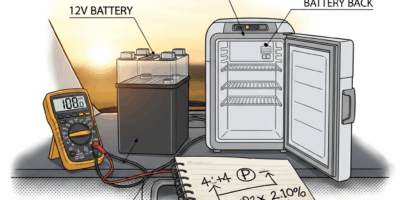
12V Power
While you won’t need a full dual-battery vehicle system with a DC-DC charger on your first trip, you will need a handful of nights’ worth of charging covered by a portable power station. Navigation running all day, photos, satellite messenger syncing, no overnight outlet — you’ll drain your phone faster than you expect. A portable station in the 150Wh to 256Wh range covers 3 to 4 nights of phone charging plus headlamp recharges and a camera battery.
The EcoFlow River 2 at $199 and the Jackery Explorer 240 at $200 are both reasonable entry points. The Goal Zero Yeti 200X at $300 is better built — worth the extra hundred dollars if the budget stretches. Understand your actual usage patterns on your first few trips, then decide if a vehicle-integrated system makes sense later.
Satellite Communicator
Genuinely optional on your first trip — if you’re staying on established routes, filing a trip plan with someone reliable, and not going solo. Skip it if budget is the actual reason you’re skipping it. That’s a defensible call for a first trip on familiar terrain.
Not optional once you’re going remote or solo — or the person waiting for your check-in call isn’t 100% reliable about actually calling for help. The Garmin inReach Mini 2 costs $350 and runs on a subscription starting at $15/month for the Safety plan. The SPOT Gen4 is cheaper at $150, but plan costs are similar and two-way messaging is more limited. These devices have directly saved lives — Garmin’s rescue coordination data tracks confirmed extractions where the inReach was the only communication that worked. Activate the Safety plan. Suspend it between trips. The hardware cost amortizes over years of use.
The Order Matters More Than the List
Recovery first, navigation second, water third, power fourth. That’s what makes this priority structure endearing to us overlanders — it’s not about aesthetics, it’s about the order in which things go wrong when a trip turns sideways. A camp chair is real gear. It belongs at the bottom of the list, added on trip two once the non-negotiable categories are covered.
The overlanders who have genuinely bad experiences in the backcountry almost always have the same story — they bought the comfortable and the photogenic before the functional and the safe. Start with the traction boards. Download Gaia before you leave home. Print the MVUM and fold it into the glove box. Bring more water than you think you need. Everything else is a nice addition to a trip that’s already properly equipped.
Stay in the loop
Get the latest trail owl updates delivered to your inbox.