Why Your Rooftop Tent Sweats
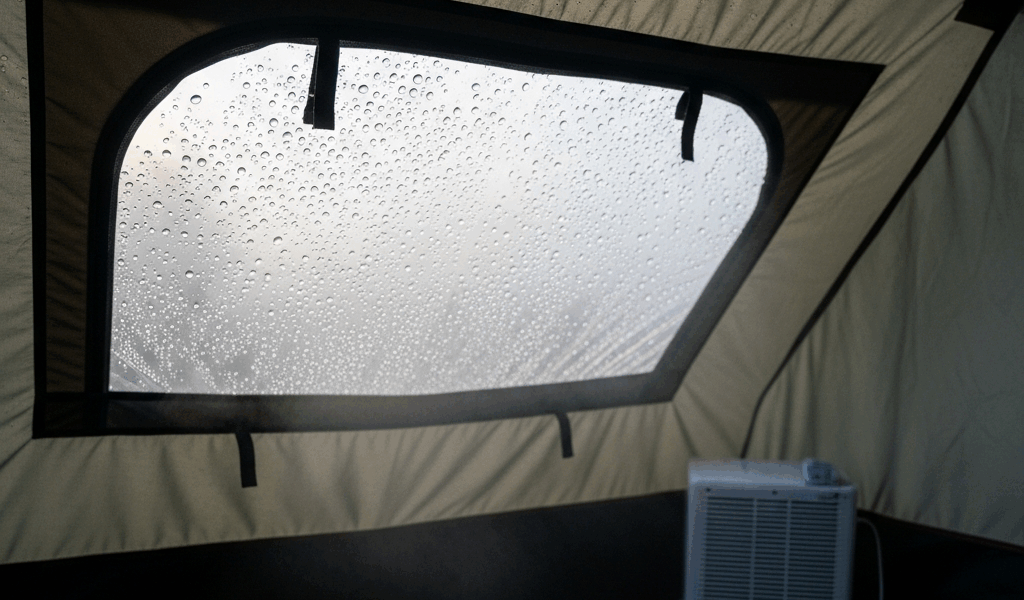
Rooftop tent condensation has gotten complicated with all the conflicting advice flying around. As someone who woke up at 2 a.m. completely drenched—clear skies overhead, no rain in sight—I learned everything there is to know about why RTTs sweat. Spoiler: it was my own breath doing it. Your lungs alone push out roughly 16 ounces of moisture every single night. Now picture that vapor hitting cold aluminum or canvas panels a few inches above your face.
That’s basic physics—the same reason your car windows fog up on a chilly morning. But what makes RTTs especially bad? In essence, they sit 6 to 8 feet above the roof, fully exposed, and shed ambient temperature faster than any ground tent ever could. A 40-degree night with a 70-degree sleeping bag interior creates a 30-degree differential—essentially a perfect condensation machine.
One sleeper generates moisture. Two sleepers double it. Run a propane heater inside and you’re actively pumping humidity into an enclosed shell with nowhere to escape except straight onto the cold walls. This isn’t a design flaw. It’s thermodynamics. But it’s fixable—once you figure out whether you’re dealing with a hardshell problem, a softshell problem, or a heating problem.
Hardshell RTT Condensation Fixes
Hardshell tents—iKamper Skycamp 3.0, Roofnest Falcon, Thule Basin—have sealed construction going for them. What they don’t have: aluminum panels that do anything except conduct cold like a dedicated heat sink. I’ve personally seen condensation pool on a Skycamp ceiling so aggressively it dripped onto sleeping bags like an actual roof leak. Not ideal.
Anti-condensation mats are the first move. These aren’t insulation—don’t make my mistake of confusing the two. They’re capillary barriers, usually dense foam or specialized fabric, designed to wick moisture away before it contacts the shell directly. Roofnest bundles them into certain models. Aftermarket versions run $150 to $300 for tents that don’t. You mount them to the interior ceiling and they absorb the water before it can drip on your face at 3 a.m.
Insulation Panels Under the Shell
Probably should have opened with this section, honestly. Real insulation and anti-condensation mats are two completely different things—and real insulation is the nuclear option.
What you’re doing here is placing a thermal barrier between the aluminum shell and the interior air, so the metal never gets cold enough to trigger condensation in the first place. Closed-cell foam panels with an R-value between 3.5 and 5.0 per inch, retrofitted directly under the shell. Labor-intensive—you’re removing interior panels. Materials run $400 to $700. But I’ve talked to owners who did this and reported condensation gone entirely.
One Skycamp owner—frustrated by waking up soaked on every trip below 40 degrees—installed 1-inch Armacell insulation boards ($200 worth of material), sealed every seam with foam tape using a plastic wallpaper roller in his driveway on a Saturday morning, and reported zero condensation on a 35-degree night that previously soaked his tent. Trade-offs: 8 to 12 pounds of added weight, roughly an inch of lost headroom. For a lot of people, that’s nothing.
The Crack Strategy — Ventilation Without Rain
Most hardshell tents have pop-up roof vents. Open them completely and rain pours in. Crack them 1 to 2 inches? Air actually moves. Moisture actually escapes.
The Roofnest Falcon has dual roof vents built for partial opening. The iKamper Skycamp 3.0 has a center vent that cracks nicely. You’re creating negative pressure—warm, moist air rises and exits through the gap while the interior stays warm enough that incoming exterior air doesn’t immediately condense on entry.
Works brilliantly in dry climates. In the Pacific Northwest in November, you’re fighting a losing battle—honestly, don’t bother. But in the desert Southwest, cracking a vent 1.5 inches overnight regularly drops interior humidity from 85% to below 60% without letting a single drop of rain inside. That’s what makes the crack strategy endearing to us desert campers.
Portable Dehumidifiers and Desiccants
Active 12V dehumidifiers are rare for RTTs—the power draw is ugly. Passive desiccants, though? Genuinely useful. Calcium chloride moisture absorbers—similar in principle to the little packets inside supplement bottles, just much larger—pull humidity from the air with zero electricity involved.
One liter of calcium chloride pellets runs about $15 and absorbs 50 to 60% of its own weight in water. For a 4-season hardshell on a properly wet night, plan on 2 to 3 liters. They saturate and stop working—but here’s the part people miss—they’re reusable. Bake them at 300 degrees for 90 minutes and they reset completely. Some RTT enthusiasts sew small mesh bags and hang them in tent corners. Not glamorous. Effective.
Softshell RTT Condensation Fixes
Canvas breathes—that’s the pitch, and it’s not wrong. The Smittybilt Overlander, the 23Zero Breezeway, these are fabric-first designs where water vapor can actually pass through the canvas fibers themselves. But what is “breathable canvas” really? In essence, it’s a material that slows condensation rather than stopping it. It’s much more than a marketing term, but it’s also much less than a cure.
You’ll still wake up with damp interior canvas after a cold night, especially when exterior temps drop 20 degrees between dusk and dawn. Canvas traps moisture between its outer weatherproof coating and inner fabric layers—and that moisture has to go somewhere.
Rainfly and Airflow Strategy
Here’s where softshell diverges hard from hardshell thinking. The rainfly isn’t just weather protection—it’s apparently your primary condensation tool, which nobody explains clearly in the product listings. A properly deployed rainfly creates an air gap between itself and the canvas. That gap lets moisture evaporate from the canvas before it ever reaches interior fabric.
The 23Zero Breezeway includes a mesh panel in the rainfly specifically for this—air circulates through, carrying moisture out instead of letting it condense and drip. The Smittybilt Overlander skips the mesh panels, so owners typically deploy the rainfly only partially, leaving intentional gaps at the sides. You’re trading some rain protection for ventilation. On clear cold nights, that’s an easy call.
Ideally, airflow moves underneath the rainfly from both sides simultaneously. Don’t stake it down tight—leave 3 to 6 inches of gap at the side seams. Wind pushes air through and canvas dries faster. In completely calm conditions, moisture still builds up, but the gap keeps condensation from forming inside the tent proper.
Interior Mesh Panel Deployment
Softshell tents with interior mesh panels—canvas above, mesh venting below—consistently outperform full-canvas designs in moisture management. The mesh lets air circulate between your sleeping area and the rainfly-canvas boundary where condensation actually forms.
Deploy them on dry nights or any night where interior humidity is the worry but exterior rain isn’t. On genuinely wet nights, close them—trade the airflow for dryness, accept slightly damper canvas in the morning. Smittybilt’s design includes manual mesh screens on the lower tent walls with adjustable coverage, which honestly gives you more flexibility than most competitors.
Annex Ventilation and Extended Awnings
Softshell tents with attached annexes—the 23Zero being the obvious example—become moisture traps when the annex is sealed tight. Keep the annex vents cracked, or leave the connection between main tent and annex partially unzipped. Sounds counterintuitive in bad weather. But the nights you’re most likely to experience serious condensation are clear, cold, windless evenings—not rainy ones. On those nights, annex ventilation prevents humidity from concentrating in one enclosed space.
If you’re sleeping in the main tent and not using the annex at all, open the annex fully. It functions as a moisture buffer—essentially a drying chamber attached to your sleeping space.
Cold Weather Camping When Opening Windows Is Not an Option
You’re at 15 degrees in Colorado. Wind is gusting. Rain is possible. Cracking a vent means cold air flooding in and potential water infiltration—so you don’t. Closed-shell camping is your only realistic option, and closed-shell camping almost always means condensation. This is where heating method matters more than most RTT content ever bothers to explain.
Diesel Heater Advantage
A diesel heater—Webasto, Eberspächer, take your pick—pulls combustion air from outside the tent, runs it through a heat exchanger, and exhausts entirely outside. Zero moisture generated inside the tent. The air heating your interior originates outdoors, so it’s dry regardless of temperature outside.
Installation runs $1,200 to $2,000, which is genuinely painful. But if you’re regularly winter camping in serious conditions, condensation elimination is almost a side benefit compared to the actual warmth. Fuel consumption sits around 0.5 gallons per night at moderate heat. Installation requires routing an exhaust line, which takes an afternoon if you’re handy.
Propane Heating Produces Moisture
A Mr. Buddy heater or any similar propane unit combusts fuel inside your tent interior. For every BTU of heat it produces, roughly 1.6 BTUs of latent heat releases as water vapor directly into your sleeping space. You’re intentionally humidifying the tent while heating it. In a closed RTT, condensation isn’t a risk—it’s a guarantee.
If propane is your only realistic option, accept that condensation will happen and shift your strategy toward management rather than prevention. Desiccant absorbers become essential here, not optional.
Battery-Powered Dehumidifiers
True dehumidifiers—units that actively extract moisture rather than passively absorbing it—do exist in 12V automotive versions, though they’re less common than you’d expect given the obvious demand. The Eva-Dry 333 runs $80 to $120, rechargeable, genuinely portable. Capacity is small—it’s built for cars and compact spaces—but running it during morning hours inside a closed RTT pulls measurable moisture over 6 to 8 hours.
Charge it off your auxiliary battery or solar setup between uses. It’s not a complete solution on its own—don’t make my mistake of thinking one gadget fixes everything—but it reliably reduces relative humidity by 10 to 20 percentage points, which prevents the worst dripping and the soaked sleeping bag scenarios.
Merino Wool Sleeping Bag Liners
Merino wool might be the best overlooked option here, as cold-weather RTT camping requires managing moisture at the source. That’s because your body’s immediate microclimate—the humid air surrounding you inside your bag—is where most tent moisture originates. Merino absorbs up to 30% of its weight in moisture while still feeling completely dry against skin.
A merino wool liner—not the sleeping bag itself, just the liner—runs $100 to $180 and sits between you and your bag. Your moisture-saturated microclimate gets partially absorbed by the wool instead of escaping into the tent interior. Not elimination, but a consistent 20 to 30% reduction in nightly moisture load. Combined with desiccants and whatever ventilation you can manage, it’s a meaningful piece of a cold-weather system.
The Morning Routine That Prevents Mold
Managing condensation overnight handles the acute problem. Mold is the chronic one—it grows during the day when wet fabric sits inside a closed RTT without any airflow. Don’t make my mistake of assuming a damp tent will somehow sort itself out.
The Wipe-Down Protocol
As soon as you wake—before coffee, before breakfast, before checking your phone—open the tent completely and wipe every interior surface with a microfiber cloth. Ceiling first, since condensation pools there. Walls second. Floor last.
Five minutes total. Removes roughly 80% of standing water. You’re stopping moisture before it soaks into fabric layers where mold spores actually thrive. I skipped this on lazy mornings for an entire three-day trip once. By day three, the interior canvas smelled faintly musty. Now it’s the first thing I do—non-negotiable, honestly.
The 36-Hour Drying Rule
After any trip, a damp RTT should never be closed and stored immediately. Minimum 36 hours of drying time—ideally in direct sun with decent wind moving through. Raise the tent to full height, open every panel, and let air circulate completely through the interior.
Frustrated by a musty smell he couldn’t identify, one RTT owner I know eventually traced it back to storing his tent damp after a rainy weekend—closed it Sunday night, didn’t open it again for six days. By the following Saturday, interior canvas had visible black spots. Full cleaning with straight white vinegar, 48 hours of sun exposure, and even then a faint smell lingered for another month. The cost of a 36-hour drying routine is inconvenience. The cost of mold remediation is money, time, and sometimes the tent itself.


Stay in the loop
Get the latest trail owl updates delivered to your inbox.