Why You Need a Dual Battery System
Overlanding power management has gotten complicated with all the conflicting advice flying around. So let me start with a story that’ll make everything click.
Three nights. Orange River, South Africa. Dead starter battery. My 65-liter ARB fridge had quietly drained everything while I slept — and I couldn’t start the truck to drive out. Sat there in the heat, watching a vulture circle something upstream, wondering if it was circling me next. That was 2019. That’s when I truly understood why overlanders obsess over dual battery setups.
But what is a dual battery system? In essence, it’s a second battery that handles your auxiliary power loads so your starter battery never gets touched. But it’s much more than that.
This article includes affiliate links. We may earn a commission at no extra cost to you.
Your factory starter battery wasn’t built to power a fridge. It was engineered to crank your engine once every morning — that’s genuinely its entire job description. Everything else you plug in — LED light bars, USB chargers, 12V compressors, heated blankets — pulls from the same reserve that needs to fire a cold diesel at 4,000 meters above sea level. That’s a problem.
Install a second battery. Run a proper isolator or DC-DC charger between them. Now your fridge and lights draw from the auxiliary battery. Your starter battery stays untouched. The auxiliary charges whenever the engine runs. That’s the whole premise — honestly, it’s not complicated once you see it laid out.
I’ve met overlanders who’ve crossed Africa and South America on single batteries with disciplined daily charging routines. It works. It’s also exhausting in a way that quietly ruins trips. A dual battery setup removes that mental weight entirely. You stop rationing power like water in the Atacama.
Choosing Components — Isolator, DC-DC Charger, or Battery Management System
Three main technologies charge your auxiliary battery. Getting this wrong means buying twice — so let’s get it right the first time.
Solenoid Isolators — The Budget Play
A solenoid isolator is the simplest device in this category. When your alternator voltage climbs above roughly 13.2V, a magnetic relay clicks your two batteries together. They charge as one system. Kill the engine, voltage drops, the solenoid disconnects — your auxiliary battery is now isolated. Simple. Mechanical. No firmware to update.
Cost runs $40–$120 depending on amp rating. Redarc SBI12, Ironman 4×4 versions, and most major 4WD suppliers carry these. They’re genuinely everywhere.
The upside: dead simple. No computers. No lithium compatibility headaches. Works in any temperature without complaint. Cheap enough that replacing one hurts about as much as a bad lunch.
The downside: it charges at whatever voltage your alternator outputs — usually around 14.4V. Lead-acid batteries shrug at that. Lithium batteries hate being overcharged at unregulated voltages. You’ll either need a lithium-specific charger downstream or accept a shortened battery lifespan. Also worth knowing: if your auxiliary battery is critically depleted, reconnecting it during engine start can stress your alternator harder than it wants to be stressed.
Use a solenoid isolator if you’re running AGM batteries and want the cheapest functional entry point. Skip it entirely if you’re going lithium.
DC-DC Chargers — The Smart Middle Ground
A DC-DC charger sits between your alternator and auxiliary battery. It takes whatever your alternator outputs and converts it to the exact voltage profile your specific battery chemistry needs. No guessing. No overcharging. No drama.
Cost: $300–$900 depending on amp output and brand. The Redarc BCDC1240D is the Australian gold standard — runs around $500 and has a reputation for surviving genuinely awful conditions. The Victron Orion-Tr Smart 30A sits closer to $600–$800. Worth every cent, in my experience.
The upside: lithium-compatible when configured correctly, proper battery isolation, faster charging than a solenoid, built-in reverse polarity protection, and some models include solar input controllers so you can run panels simultaneously. One box handles a lot.
The downside: costs five times what a solenoid does. Adds real complexity. If you swap battery types later, you’ll need to reconfigure voltage profiles — not hard, but not nothing either. Failure requires professional-level diagnosis.
That’s what makes DC-DC chargers the default recommendation for overlanders who want actual capability. Buy once, configure once, forget about it for a decade.
Battery Management Systems — The Full Monty
A BMS integrates the charger, isolator, and load management into one unit. Premium systems — think Victron Cerbo GX paired with a MultiPlus, or Epever setups with 200+ amp capacity — monitor temperature, current draw, state of charge, and voltage in real time. They can cut loads automatically before your battery drops below a threshold you set.
Cost: $1,000–$3,000+ for a serious installation. You’re not just buying hardware — you’re buying a monitoring ecosystem.
The upside: handles lithium batteries perfectly, monitors everything obsessively, integrates solar and shore power, and future-proofs a serious build. If you want to know your exact amp-hours remaining at 11 PM in Namibia, this delivers that.
The downside: massive overkill for most overlanders. Requires understanding configuration menus that aren’t always intuitive. When something fails — and eventually something does — repair costs real money and potentially real time in the field.
Most people reading this don’t need a BMS. It belongs on expedition trucks that stay deployed for months, or in the hands of drivers who genuinely enjoy obsessive energy monitoring. That’s what makes full BMS setups endearing to the hardcore expedition crowd — but for a 4-week overland trip, it’s usually solving a problem you don’t have.
Lithium vs AGM — The Battery Decision
Probably should have opened with this section, honestly. Everything else flows from this choice.
Lead-Acid AGM Batteries
AGM stands for Absorbent Glass Mat. The electrolyte is absorbed into fiberglass matting rather than sloshing around as liquid — which makes these batteries spill-proof, vibration-resistant, and maintenance-free. They’ve been the overlanding standard for decades for good reason.
A decent 100Ah AGM runs $300–$600 depending on brand. Optima, Odyssey PC2150, and Century brand units are common in Australian and South African markets. You’ll find them at any automotive store on any continent.
AGM advantages: forgiving of overcharging, genuinely better cold-weather performance than lithium, no BMS required, universal availability when you’re somewhere remote and something goes wrong. You can also use them to jump-start other vehicles — which matters.
AGM disadvantages: usable capacity is roughly 50% of rated capacity if longevity matters to you. A 100Ah AGM gives you about 50Ah of reliable power before you’re degrading the battery. They’re also heavy — a 100Ah AGM weighs around 30kg. And voltage sag under load is real: your fridge runs less efficiently as battery charge drops, which compounds the capacity problem.
Lithium LiFePO4 Batteries
LiFePO4 — Lithium Iron Phosphate — is a distinct chemistry. Safer than other lithium types, non-flammable under normal conditions, and purpose-built for stationary and mobile power applications. It’s the chemistry that actually makes sense for overlanding.
A Victron LiFePO4 Smart 100Ah runs $900–$1,200. Ampere Time and Westinghouse lithium units come in at $700–$900 for 100Ah. More upfront, full stop.
Lithium advantages: 80%+ usable capacity — a 100Ah lithium gives you 80Ah safely. About half the weight of AGM for equivalent capacity, so a 100Ah lithium weighs roughly 13kg. Zero voltage sag under load. Faster charging. 10+ year lifespan versus 4–6 years for AGM. You buy it once and genuinely never think about it again.
Lithium disadvantages: 2–3 times the upfront cost. Needs a DC-DC charger or lithium-compatible isolator — run the wrong charger and you’ll shorten the battery life significantly. Won’t start your truck if critically depleted because the internal BMS shuts cells down below 2.5V per cell. And cold performance, while better than other lithium chemistries, still falls short of AGM below -10°C.
I’m apparently a “buy it once and be done” type of person — Ampere Time 200Ah lithium works for me while AGM setups never quite gave me the confidence I wanted. Cost was $1,400. I haven’t thought about voltage once while running three devices simultaneously, and I don’t expect to for another decade. Don’t make my mistake of hesitating on this for two years first.
For overlanders doing 4+ week trips, lithium pays for itself in weight savings and power reliability alone. For weekend warriors doing 3-day runs, AGM keeps cash in your pocket and works perfectly well. So, without further ado, let’s talk wiring.
The Wiring — Step by Step
Wiring a dual battery system looks intimidating. The actual path is simple: starter battery → isolator/charger → auxiliary battery → fuse box → loads. Follow that path and you won’t go wrong.
What You’ll Need
While you won’t need a professional electrician for a standard setup, you will need a handful of specific components before touching a single cable.
- 2 batteries (starter and auxiliary)
- Isolator, DC-DC charger, or BMS — your chosen technology
- Battery cables: 2-gauge or 4-gauge depending on distance and current draw
- Anderson connectors or heavy-duty ring terminals
- Inline ANL or Mega fuse holders
- Fuses matched to your wire gauge
- A proper battery box or mounting tray
- A quality crimper and adhesive-lined heat shrink tubing
- A multimeter — non-negotiable for testing
Cable Sizing Matters
Wire gauge is not a style choice. Use undersized cable and you lose voltage over distance, create resistance that generates heat, and set up conditions for an electrical fire. This is the part most DIYers get wrong because it feels like a minor detail.
The rule: the further your auxiliary battery sits from your engine bay, the thicker the main cable must be. Auxiliary battery in the truck bed, 3 meters from the starter battery? Use 2-gauge for the main run. One meter away under the hood? 4-gauge handles it. Beyond 4 meters — think 5th-wheel setups or long-bed trucks — go 0-gauge or larger.
Quick reference:
- Up to 3 meters at 100 amps: 2-gauge
- 3–6 meters at 100 amps: 0-gauge or 00-gauge
- Up to 2 meters at 60 amps: 4-gauge
- 2–4 meters at 60 amps: 2-gauge
When in doubt, go thicker. Heavy cable is substantially cheaper than an electrical fire — or a stranded truck 200 kilometers from the nearest town.
The Step-by-Step Path
Step 1: Mount your auxiliary battery securely. Use a proper battery box or tray that prevents movement on rough terrain. Lithium batteries in particular have internal cells that don’t appreciate constant vibration impacts. Secure it with straps rated for at least twice the battery weight. Position it as close to the starter battery as your setup allows — every extra meter of cable costs you voltage.
Step 2: Run positive cable from starter battery to isolator input. First, disconnect the negative terminal from your starter battery — always do this before working near any battery terminal. Run 2-gauge cable from the positive terminal through a firewall grommet or directly under the hood to your isolator or DC-DC charger’s input. Install an inline ANL fuse holder within 30 centimeters of the starter battery positive terminal. A 150A fuse matches 2-gauge cable here.
Step 3: Run positive cable from isolator output to auxiliary battery. From the isolator’s output terminal, run another 2-gauge cable to the positive terminal on your auxiliary battery. Install another inline fuse holder close to the auxiliary battery — size it to match your actual load. Running a 60A charger? Use a 60A fuse on this side. Running 100A? Use 100A. This protects the auxiliary circuit independently of the starter side.
Step 4: Run your negative cables properly. This is where DIYers fail most often. Never run a single negative cable from starter battery to auxiliary battery and call it done. Run separate negative cables from each battery to a common chassis ground point — your truck frame acts as a ground bus, and both negatives should meet at the same bolt on that frame. Use 2-gauge for the starter negative and 4-gauge for the auxiliary negative.
Step 5: Connect the isolator per its specific manual. Every brand wires slightly differently — this isn’t the place to wing it. Most solenoid isolators have three terminals: starter input, auxiliary output, and ground. DC-DC chargers like the Redarc BCDC1240D often include additional inputs for temperature sensors and remote on/off switches. Follow the manual. Seriously.
Step 6: Build your auxiliary fuse box. Run 4-gauge cable from the positive terminal of your auxiliary battery to a fuse box — this is the distribution point for every load you’ll run. Each device gets its own breaker or fuse rated specifically for that load. A typical ARB fridge pulls around 10 amps continuous. A 100-watt inverter pulls roughly 8 amps. Your LED light bar might draw 5 amps. Fuse them at 10A, 10A, and 7A respectively, with a small buffer built in.
The Math of Fusing
Fuse size = max load current multiplied by 1.25, rounded up to the next standard fuse size. That’s the formula. Use it every time.
A 100-watt LED light bar at 12 volts draws 8.3 amps — fuse it at 10 amps. A 10-amp continuous fridge stays at a 10-amp fuse. Don’t guess. Undersizing a fuse means it blows during normal use. Oversizing eliminates the protection entirely and risks a fire if something shorts.
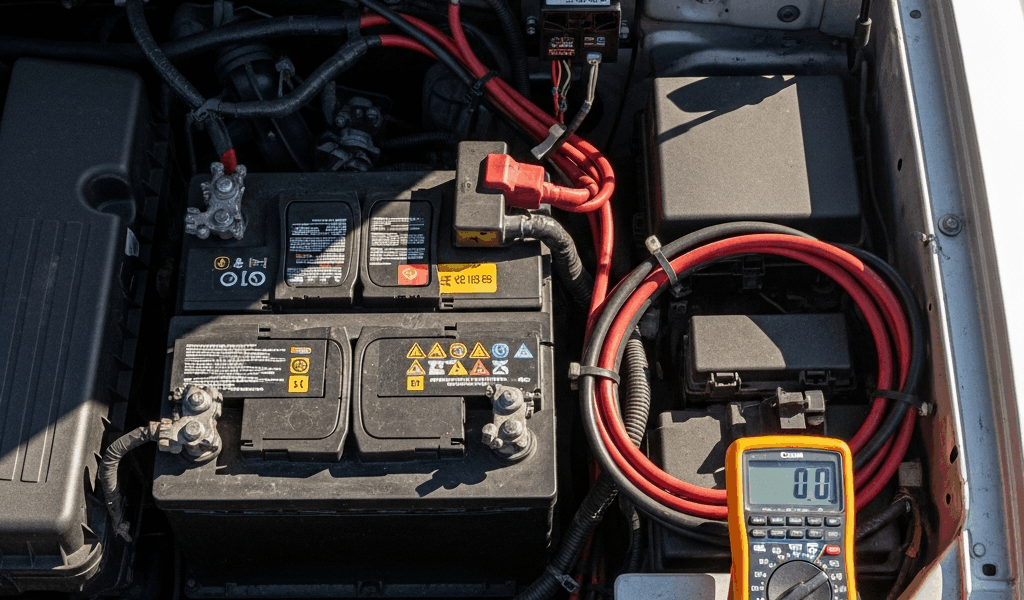
Testing Before You Drive Anywhere
Set your multimeter to DC voltage. Engine off: measure the starter battery — should read 12.6–13.2V. Measure the auxiliary battery — should match closely. Start the engine. Measure again. Starter battery should show 13.8–14.4V. Auxiliary battery should match within 0.2V on a DC-DC charger setup.
Let the engine idle for 30 minutes. Watch the auxiliary battery voltage climb gradually. If it’s not climbing, your isolator isn’t engaging or you have a loose connection somewhere. Find it now, not on a remote track in the dark.
What Your Dual Battery Can Actually Run
Math matters here because overlanders consistently overestimate their usable capacity — usually at the worst possible moment.
A 100Ah lithium battery at 12 volts stores 1,200 watt-hours total. Using 80% of that without stressing the battery gives you 960 watt-hours usable. Sounds like a lot. Let’s see what it actually means in camp.
An ARB E63 fridge draws around 10 amps continuous — that’s 120 watts. Divide 960 watt-hours by 120 watts and you get 8 hours of continuous operation before the battery is depleted. Run it all night and through a warm afternoon, and you’re going to drain that battery completely. In practice, your fridge also runs harder as voltage drops, consuming more per hour as the battery depletes — which accelerates the math against you.
Better approach: assume 50–60% usable capacity for overlanding calculations. It builds in a buffer for temperature effects, voltage sag, and the reality that you’re running more than just a fridge.
At 50–60 amp-hours usable from a 100Ah lithium, you can realistically:
- Run a fridge for 20+ hours at moderate ambient temperatures
- Charge five phones completely (roughly 2 amp-hours per charge)
- Power LED camp lights for 40+ hours at typical brightness
- Run a small air compressor for filling tires several times over
Real example from my truck: four-day autumn camp. Fridge runs 12 hours per day in cool conditions — call it 35 amp-hours daily. Evening LED lights and phone charging add maybe 10 amp-hours across the full four days. USB charging during driving days partially replenishes the battery as I go. By the end of day four on my 200Ah Ampere Time setup, I’ve used roughly 50 amp-hours. I could camp another four days before needing a serious recharge. Summer heat changes that math — the fridge works harder, draws more, and a 100Ah battery starts feeling genuinely limiting by day three.
Plan conservatively. Calculate your expected loads in amp-hours. Subtract 20–30% for temperature effects, age, and the loads you always forget to include. That number is your real working capacity.
A dual battery setup transforms overlanding from a power-rationing exercise into something that just feels normal. You stop watching battery percentages like a hawk. You stop choosing between running the fridge and charging the camera batteries. You camp the way you actually want to camp — because you’ve solved the infrastructure problem first.
Get your isolator or charger chosen. Mount the battery securely. Run your cables properly. Fuse everything individually. Test it thoroughly before any trip that matters. Then drive — knowing you’ve already solved the problem that left me stranded on the Orange River watching that vulture circle overhead.


Stay in the loop
Get the latest trail owl updates delivered to your inbox.