Why Overlanding Awnings Keep Collapsing
Overlanding awnings have gotten complicated with all the conflicting advice flying around. As someone who has spent four seasons chasing campsites across Australia and southern Africa, I learned everything there is to know about RTF awning failures — usually by watching them happen in real time. Today, I will share it all with you.
The good news: a collapsing awning isn’t usually totaled. Honestly, it’s almost always one of four problems. And you can figure out which one in under an hour.
Loose arm locking pins fail first. Metal-to-metal friction wears down from repeated deployment cycles, salt air, or — and this happened to me personally at Tankwa Karoo — someone didn’t fully seat the pin while setting up in the dark. That someone was me.
Worn rafter hinges come second. The pivot points where your awning frame meets the mounting rail get hammered constantly — wind, vibration, washboard roads. They develop play. Then the whole structure twists under load.
Mounting rail bolts are third. Your roof rack’s cross-bar tension transfers directly to those fasteners. A sagging bar or a missed retorque creates a domino collapse faster than you’d expect.
Wind exceeding design limits rounds out the list. Most budget RTF awnings handle 40 km/h gusts reliably. Beyond that, you’re fighting physics — not a fixable mechanical problem.
Check the Arm Locking Pins and Rafter Hinges First
Start here. This fix takes thirty minutes and solves the problem roughly 60% of the time in the field. Don’t skip ahead.
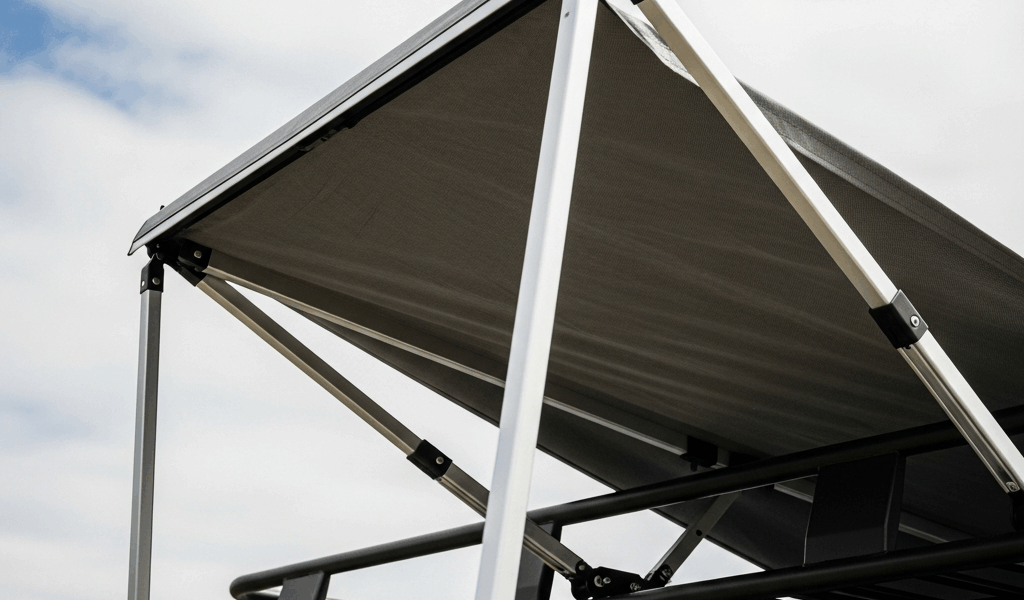
Each awning arm has one or two locking pins depending on brand. ARB uses a tapered steel pin with a cross-hole for a retaining cotter. Rhino-Rack favors a lever-lock that rotates into place. Front Runner sits somewhere in between — a pin-and-clip system. Check your manual now, before you’re squinting at it in the dark.
Deploy the awning fully. Look at the base of each arm where it slots into the rafter mounting bracket. The pin should sit flush and not move when you push sideways with one finger. If it wobbles, you’ve found your problem.
The Pin Test
Press the pin by hand. Should feel firm. If it slides without resistance, the hole has worn oversized or the pin itself has lost its taper — both are common after two or three seasons of hard use.
Pull it out completely and hold it up to direct sunlight. You’re looking for scoring, flattening, or gaps where the metal should be uniform. A worn pin won’t seat consistently. Your awning will sag at a slightly different angle every single time you deploy it.
If the pin looks fine, the bracket hole is probably the culprit. Shim it with thin stainless washers — I used 1.2 mm washers from a hardware bin, around $3 for a pack of ten — and stack them until the pin seats with medium hand resistance. That fix bought me six more months on a Rhino-Rack setup before I finally replaced the bracket.
Rafter Hinge Inspection
With the awning fully deployed, grab the arm near the rafter joint and try twisting it up and down with moderate force. You should feel almost nothing. Any flex or creaking means the hinge pivot has worn.
Look at the bolt connecting the hinge to your mounting rail. Most are M8 or M10 fasteners. Corrosion, discoloration, or any visible gap between the bolt head and bracket means that fastener has backed out under vibration. It happens gradually — then all at once.
Tighten it with the awning fully extended. Use a 13 mm wrench on the nut side and a socket on the head. Torque to manufacturer spec — usually 25–35 Nm for M8. Don’t over-torque. You’ll strip the threads in aluminum, and that’s a much worse problem.
Mounting Rail Tension Is Usually the Hidden Culprit
Probably should have opened with this section, honestly. I spent three full months troubleshooting arm pins before realizing my roof rack cross-bar had sagged 2 mm from heat cycling. Two millimeters. That tiny movement translated directly into mounting rail misalignment — and my awning popped open every time I extended it in afternoon sunlight.
Your awning bolts to a rail running perpendicular to the vehicle roof. That rail is only as rigid as whatever supports it underneath — usually two cross-bars on your rack. If those bars aren’t sitting at identical height, or if they’ve shifted even a few millimeters forward or back, your mounting rail will be twisted. The entire awning frame fights itself every time you extend it. Don’t make my mistake.
The Flush-Fit Test
Retract the awning completely. Crouch down on a camp chair and sight along the mounting rail from the front of the vehicle. Single clean line. No twist, no dip at one end. If it looks even slightly off, it probably is.
Set a small level on top of the rail. It should read level side-to-side. One edge higher than the other means your cross-bars need re-tensioning or shimming — I’m apparently a shimming evangelist at this point, and it works for me while retorquing alone never fully solved anything.
Now check every bolt holding the rail to the cross-bars — specifically the vertical ones, which take the main load. Use a torque wrench. Most manufacturer specs sit between 18 and 25 Nm. A bolt that spins freely is a loose bolt. Simple as that.
Re-torque Protocol
Loosen all rail bolts by one quarter-turn first. This relieves built-up tension and lets the rail settle naturally. Then torque them in a cross pattern — front-left, rear-right, front-right, rear-left — back to spec. That sequence prevents the rail from introducing a twist as you tighten.
Deploy and collapse the awning three times to settle the fasteners. Then re-check torque. Friction losses from that first cycle usually mean bolts need one final quarter-turn to come fully up to spec.
How to Stiffen Your Setup Against Wind Without Buying New Gear
Once mechanical wear is eliminated, wind is your next battle. An awning doesn’t need to be perfect to stay rigid in calm conditions. It needs to be perfect to survive gusts — and that’s a different standard entirely.
Guy wires are non-negotiable. If your awning didn’t come with them, buy a set made for your specific model. They attach at the outer arm tips and anchor to ground stakes or vehicle tie-down points. Tension them snug but not aggressive — you’re aiming for roughly 15–20 kg of load, not pulling the arm downward.
Adjust your arm extension angle. Most RTF awnings deploy at variable extensions. Shorter extension means less wind catch. On rough-weather days, go halfway out. You lose some shade but gain real stability — a trade worth making.
Deploy into the wind when the site allows it, not with it. An awning facing into gusts gets pushed flat against the vehicle. Sideways cross-wind loading is what actually destroys arm joints.
Honest threshold: most budget awnings start failing structurally around 45–50 km/h. That’s not a fixable number — that’s just physics. Pack it up, find shelter, or accept you’re in temporary territory now.
When the Awning Is Too Far Gone to Fix on Trail
If you’ve gone through pins, hinges, and mounting rail and the awning still collapses — the frame itself is damaged. Bent rafter arms or cracked mounting brackets won’t be fixed in the field. Full stop.
For emergency shelter in that situation: zip-tie the awning to your vehicle’s side rails in the collapsed position so the fabric can’t whip in wind. Use paracord to brace any visibly bent arm against the vehicle body, stopping it from flexing further and tearing the fabric along the seam line.
Collapse slowly and deliberately. Rushing invites the awning to fold at stress points and rupture seams — damage that’s expensive to repair back home. If an arm won’t retract, don’t force it. Loosen the hardware, adjust the angle, and try again.
Replacement makes more sense than repair when the frame is dented or cracked. Field welding weakens aluminum. You’ll be back diagnosing the same collapse in six months, probably somewhere worse.


Stay in the loop
Get the latest trail owl updates delivered to your inbox.