Why Overlanding Water Systems Fail
Overlanding water systems have gotten complicated with all the gear reviews and YouTube builds flying around. Probably should have opened with this section, honestly — most failures aren’t mysterious. They’re predictable, avoidable, and diagnosable roadside if you know what you’re actually looking at. I watched a guy hand-pump water into a 5-gallon bucket outside Moab last spring because his $800 integrated setup seized 40 miles from the nearest town. That image stuck with me.
Three things kill most systems: an undersized pump that can’t generate real pressure, improper tank venting that creates vacuum lock, and cheap fittings that crack under vibration and heat cycling. I’ve seen each one independently. I’ve seen all three simultaneously — same truck, same trip. The bed topper layout with a 1.5 GPM pump feeding a roof-mounted tank is the worst offender I keep encountering. That’s not opinion. That’s math.
Once you understand the failure modes, you can design around them or troubleshoot in real time. Most overlanders treat their water system like a black box — flip the switch, water comes out, assume everything’s fine. Then one afternoon it isn’t.
Pump Not Priming — What Is Actually Wrong
Pump runs. No water moves. This is the most common failure I see, and it’s the most Googled problem in overlanding forums for good reason. Before you replace anything, check three things — in this order.
Air Lock in the Inlet Line
Trapped air stops water from entering the pump chamber. The motor spins uselessly, pulling vacuum but no liquid. Testing takes seconds. Pop the fill cap on top of your tank — if water surges out or air bubbles in hard, you’ve got inlet-side air lock.
Fix it by cracking the inlet port on the pump itself, usually a barbed fitting with a small compression nut. Let water dribble out until air stops following. Retighten. You’re bleeding the line manually — the pump can’t prime itself when air’s blocking the path.
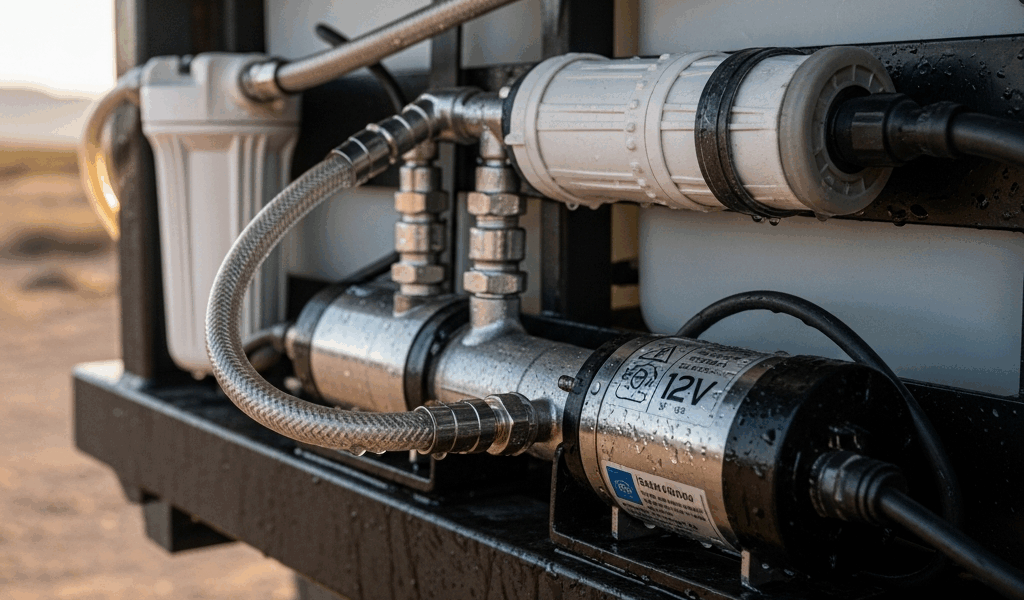
Inlet Filter Completely Clogged
Most builds use a 100-micron or 200-micron screen on the tank pickup tube. Three weeks of desert dust, dead insects, and sediment settling inside the tank coat that screen completely. The pump pulls max current, runs hot, and produces almost nothing at the faucet. From outside the tank, the filter looks totally normal. That’s the trap.
Pull the pickup tube and inspect the screen directly. A toothbrush under clean water usually clears it in a minute. I carry a spare 100-micron element sized for my pump’s GPM rating — swap takes ten minutes and costs around $6. Generic inline filters work perfectly fine here. I’ve run Flojet brand 12V pumps paired with aftermarket Fram fuel filters and had zero issues across three builds.
Pump Running Dry or Too Weak to Build Pressure
This is where pump pressure ratings actually matter. Most 12V RV pumps are rated 35–55 PSI. A gravity-feed system from a bed-mounted tank needs roughly 10 PSI. A pump-fed roof-mounted system needs 20–30 PSI just to push water upward against gravity. If your pump tops out at 35 PSI and the tank sits seven feet above the outlet — you’re already borderline. Add a partially clogged filter or a small air leak anywhere and the system quits.
Pull the pump datasheet. Anything under 45 PSI, skip roof mounting entirely. Bed-mounted or skid-mounted tanks work without issue. If roof mounting is non-negotiable, spec a 55 PSI pump minimum. Shurflo 12V pumps run $90–120 and are the industry standard for a reason. The cheaper knockoffs on Amazon typically die within a single season — don’t make my mistake there.
Running dry happens when the tank is genuinely empty or when the pickup tube sits slightly above the tank floor — surprisingly common on vehicles with any chassis lean. The pump cavitates, air enters the chamber, and prime is gone. Fill the tank completely before heading out. On week-long trips, check levels every other day. A 20-gallon tank disappears faster than expected when you’re washing dishes and filling bottles twice daily.
Tank Placement and Venting Done Right
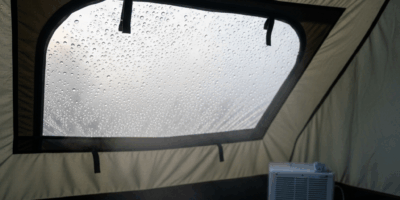
Improper venting creates vacuum lock — water slows to a trickle mid-use because air can’t replace the volume leaving the tank. You open the faucet, water barely moves, and you assume low pump pressure. Actually, the tank is collapsing its own flow by generating internal vacuum as water exits.
The vent port belongs on the tank’s high side — never integrated into the fill cap. Air needs to flow freely inward as water exits outward. A 1/4-inch barbed fitting with a 200-micron vent filter handles this cleanly. The filter keeps insects and dust from settling inside the tank through the vent line. Total cost is around $8, maybe less.
Gravity-feed systems need good venting more urgently than pump-fed setups. If you’re siphoning from a bed-mounted tank using gravity alone, a plugged vent means flow stops after a few gallons — hard stop. A pump pushes through minor vacuum, but not much. I learned this firsthand on my first overland build by positioning the vent line wrong. Water ran at full rate for about ten seconds, then dropped to a dribble. Moving the vent fitting fixed it permanently.
Bed-mounted tanks — usually 20–30 gallons — sit in the truck bed, easy to service and straightforward to drain. Vacuum issues are less severe because water doesn’t travel far downward. Roof-mounted tanks, typically 10–20 gallons, demand solid pump pressure and flawless venting since water moves upward against gravity the whole time. Skid-plate tanks mounted under the chassis offer space efficiency but are genuinely difficult to access or drain completely during a field repair.
Keeping Your Water Safe on Long Trips
Contamination ends multi-week trips faster than a broken pump ever will. Three sources matter: tank material off-gassing, stagnant water, and cross-contamination at fill points.
Polyethylene tanks off-gas plastic flavor into stored water after several days sitting warm. It’s not harmful — just undrinkable. Food-grade tanks rated NSF-51 or NSF-61 minimize this significantly. Rotoplas and Scepter both make solid options in the 20–30 gallon range. Cheap coolers repurposed as water tanks fail this test every time — water tastes like a pool toy by day two, consistently.
Stagnant water turns problematic fast on week-long trips. Install an inline 5-micron sediment filter right before your faucet or primary outlet. The cartridge housing runs about $15 and mounts under the sink or near the pump. Replace the cartridge every two weeks on active trips. I add unscented household bleach — one teaspoon per 10 gallons — when filling at the start of any trip longer than two weeks. Run water through every outlet for 30 seconds to circulate it through all lines, then top off fresh.
Fill contamination happens gradually. A sketchy well in rural Arizona leaves sediment in your jerry can. You transfer that sediment into your main tank. Seven days later, your pump inlet filter is completely clogged. Carry a dedicated clean jerry can used only for filling the main tank. A separate can handles vehicle washing or equipment rinsing — keep those two populations apart entirely.
Simple System Layouts That Work in the Field
Weekender Minimal Setup
Tank: 20-liter gravity-feed portable, under $40 at most outdoor retailers. Outlet: single spigot with shutoff valve. Vent: open hole in tank lid or a basic 1/4-inch barbed fitting. No pump. No filter needed.
This works for 2–3 day trips, weekends, or car camping where the rig isn’t moving daily. Gravity handles everything. Refill at towns or campgrounds along the way. Total cost: around $50. Weight when full: 45 pounds. Setup time: five minutes. The failure modes are a clogged vent or cracked spigot — both are field-fixable with duct tape and ten seconds of attention.
Full Overland Build with Hot Water
Tank: 30-gallon food-grade polyethylene, bed-mounted. Pump: Shurflo 12V, 55 PSI, with strainer. Inline filter: 5-micron housing installed pre-faucet. Hot water: 10-gallon propane tankless heater or a compact electric element if your aux battery setup supports it. Vent: 1/4-inch barbed fitting with 200-micron filter. Drain: ball valve with quick-disconnect fitting for fast field service.
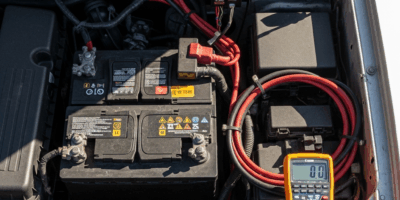
Wiring runs from the auxiliary battery through a 20-amp relay and 8-gauge wire directly to the pump. Install a pressure switch set at 40 PSI so the pump cycles off cleanly under no-load. Total system cost lands between $400–550. Build it over a weekend. You get hot showers, multiple outlets, and enough water for two people across two weeks with basic rationing. Maximum recovery time for any single component failure: 30 minutes if you’re carrying spares.
Truck Bed Topper Setup
Tank: 15-gallon slimline mounted inside the bed topper. Pump: 1.5 GPM 12V minimum — 35 PSI is acceptable here because the tank sits low. Outlet: single faucet at the topper’s rear door. Vent: critical — run 1/2-inch line, not 1/4-inch, or vacuum lock will find you eventually. Drain: gravity drain to ground with a simple ball valve.
Space is genuinely tight in this configuration. The pump has to fit under the topper roof, and wiring runs through the topper frame back to the cab. Total cost: $200–300. This setup works adequately for day trips or light weekend use — I wouldn’t take it on anything longer unless you’re comfortable filling every 3–4 days without complaint. The confined space makes proper venting tricky. If this is your layout, overspec the pump pressure rating and install the largest diameter vent line that physically fits in the available space.
Pre-Trip Field Checklist
- Fill the tank completely. Drive slowly around the block and check every fitting for drips.
- Run water at each outlet for 30 seconds. Listen for air sputtering — that’s air lock. Water should flow at full rate immediately with no hesitation.
- Check pump current draw at 12V using a multimeter. Anything above 10 amps on a standard 12V pump points to high resistance — filter clog, inlet blockage, or low battery voltage causing the pump to work harder than it should.
- Inspect the tank exterior for cracks or stress marks around fittings. Press each fitting with your thumb — firm and tight, not spongy or slightly mobile.
- Open the vent cap and confirm air flows in freely without obstruction. Close the faucet, run the pump for five seconds — it should build pressure and cut off cleanly through the pressure switch.
- Drain one gallon from the drain valve to flush stagnant water sitting in the lowest lines.
Do all of this at home before the trip leaves the driveway. Diagnosing the same failures on day 14 in the desert — with no internet, half your tools missing, and the sun doing whatever it wants — is a completely different experience.


Stay in the loop
Get the latest trail owl updates delivered to your inbox.