Start Here Before You Assume the Panel Is Dead
Overland solar troubleshooting has gotten complicated with all the conflicting advice flying around. As someone who spent three weeks stranded-adjacent in southern Utah with a 200W Renogy panel that refused to charge my lithium bank, I learned everything there is to know about diagnosing this problem. Today, I will share it all with you.
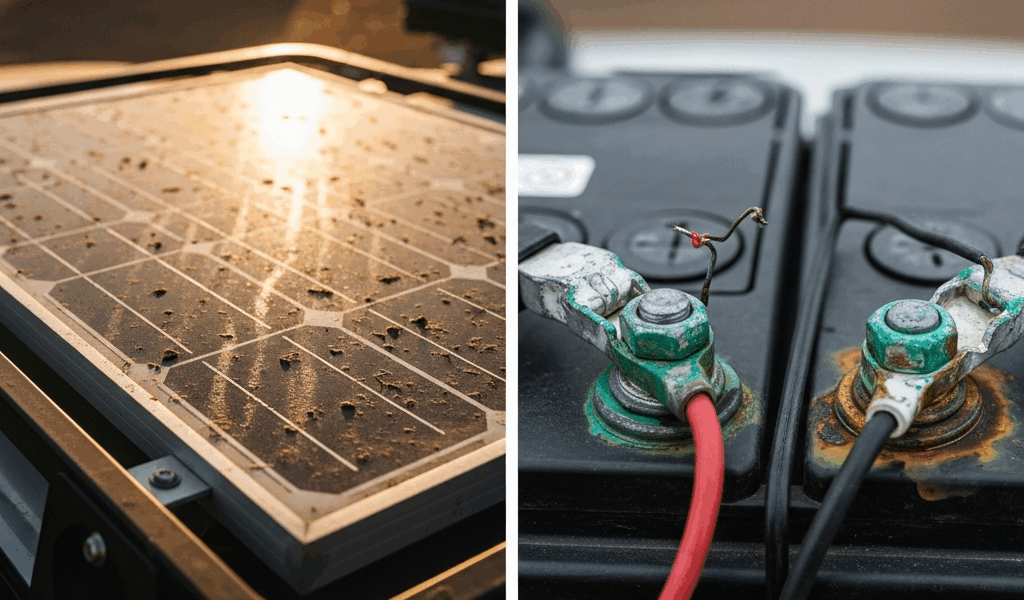
The answer, it turned out, was sitting right in front of me before I’d even cracked open my multimeter case. Two things murder solar output faster than anything else: shade and dirt. Not controller failure. Not dead cells. Shade and dirt. A rooftop tent shadow — even a partial one — can slash output by 50 percent. Dust from washboard roads diffuses light across the panel surface. Neither means your panel is dead. Both are five-minute fixes.
Walk around your vehicle in full daylight and actually look at the panel. Like, really look at it. Can you see dust, pollen, dried mud? A thin film is enough to hurt output noticeably — you don’t need a caked-on mess. Grab a microfiber cloth if you have one. Bottled water, rainwater, doesn’t matter. Wipe it down gently. No abrasive scrubbing, no harsh chemicals. Done.
Then check shade. Rooftop tent, roof rack, a jerry can strapped to the side rail — any of it can clip your output. Ideally the panel sees clean, unobstructed sun from around 9 a.m. to 3 p.m. That’s your peak window. Move whatever you can.
Now glance at your charge controller display. A PWM unit shows voltage and current in amps. An MPPT shows those plus efficiency. During daylight, you want to see positive amperage flowing toward the battery. Zero amps in bright sun — after you’ve already cleaned the panel — means something else needs attention.
But here’s the thing most people miss: if your battery is already full, the controller will intentionally show zero amps. That’s not a fault. That’s correct behavior. Check your battery voltage first. A fully charged 12V lithium reads 13.6V or higher. Flooded lead-acid at 100 percent sits around 12.7V. If the battery is maxed out, your solar system is working perfectly — it’s just not overcharging a full pack. Come back tomorrow morning and check again.
Check Every Connection From Panel to Battery
Vibration is the overlander’s quiet enemy. Probably should have opened with this section, honestly. A pinched wire or cracked insulation can silently kill your system long before anything flashier fails — and you’ll waste an hour chasing the wrong problem.
MC4 connectors are the snap-together plugs you’ll find on virtually every solar panel made in the last decade. They have locking tabs. After a thousand kilometers of corrugated dirt roads, those tabs work loose — I’ve pulled connector after connector out of spec on rough tracks and never saw it coming until I actually pushed on them.
Walk to your panel. Find the two MC4 connectors where the positive and negative wires exit. Push on them. Hard. They should feel completely solid — no click, no movement. If either one shifts or clicks when you push, that’s your culprit. Snap them together firmly until you hear a distinct, satisfying click and feel real resistance. A properly seated MC4 requires actual force to separate.
Trace the wire run from panel down to your charge controller. Look for cracked insulation, loose cable clips, any spot where the wire might chafe against a rack edge. Then check the controller’s input terminals — the ones taking voltage from the panel — and output terminals sending current to the battery. Push every wire and connector into its seat. Tighten any set screws with an Allen key or small wrench. Vibration-loosened terminals are dramatically more common than dead controllers. I’d bet on it every time.
Battery terminals deserve their own pass. Look for white, blue, or green crusty buildup around the positive and negative posts. That corrosion blocks current even when everything else is fine. Disconnect negative first, then positive. Use a small wire brush — or honestly, the edge of a coin in a pinch — and scrub the posts and clamps down to shiny bare metal. Reconnect positive first, then negative. Tighten the clamps until they require real effort to move by hand. Don’t make my mistake of assuming “finger tight” is good enough on a bumpy expedition.
Read Your Charge Controller Settings and Error Codes
But what is a misconfigured controller, really? In essence, it’s a controller that’s technically functioning but refusing to charge your specific battery correctly. But it’s much more than that — it’s also the single most common field problem I’ve encountered, and it masquerades perfectly as a hardware failure.
Your controller has a battery chemistry setting. If it’s wrong, it’ll cut off charging too early or refuse to enter bulk charge mode at all. On Renogy units, hit the Menu button and navigate to Battery Type. Options are AGM, Flooded, and Lithium. Running a lithium battery with the controller set to AGM? It’ll stop charging at a lower voltage threshold and your bank will never reach full capacity. Set it to match your actual battery. This is the most common misconfiguration I’ve seen — by a wide margin.
Victron BMV controllers handle this through a different menu structure. Use the Victron Connect app over Bluetooth if your unit supports it — much easier than the onboard display. The equivalent setting is Battery Chemistry. Same rule applies.
Generic blue MPPT controllers — the ones sold under about a dozen different brand names and manufactured by a handful of Chinese OEMs — have limited interfaces. Most show only voltage and current on a small screen. If yours has Menu navigation, look under System Settings for Battery Type. Can’t find it, or the menu seems locked? A factory reset might be your move. Usually it’s holding a single button for 10 seconds, but check your manual for the specific sequence.
Error codes tell you a lot quickly. “Load Short” means the output terminals are shorted or overloaded — check those connections. “PV Open” means the panel wiring is disconnected somewhere in the run. “Battery Overvoltage” means terminal voltage spiked past the controller’s threshold, which usually points to a loose connection or an alternator that’s also pushing current into the same bank.
Test Output With What You Have at Camp
While you won’t need a full electrical workshop, you will need a handful of basic tools — and a $15 multimeter might be the best option, as solar diagnosis requires actual voltage readings. That is because guessing at output levels without numbers wastes hours you don’t always have in the field.
Set the multimeter to DC voltage mode. In bright direct sun, touch the black probe to the panel’s negative terminal and red to positive. You should read somewhere between 15V and 22V depending on panel size and light conditions. Zero volts in full, unobstructed sun? Dead panel or completely severed wiring. Now move the probes to the charge controller’s input terminals. You should see roughly the same reading — maybe a touch lower from wire resistance. Panel reads voltage but controller input reads zero? Wiring break or loose connector somewhere between them.
No multimeter at camp? Use this proxy instead: plug a phone charger or a 12V fan into the outlet or USB port powered by that battery. If it runs, current is flowing somewhere in the system. If nothing responds, the battery may be dead or the connection is fully severed. It’s imperfect — but it confirms whether you have any current moving at all, which narrows the problem fast.
When the Panel or Controller Actually Needs Replacing
A truly dead panel reads zero volts in direct, unobstructed sunlight. Not “lower than expected.” Not “weak.” Zero. That’s your threshold. A failed charge controller won’t power on, shows garbage characters on the display, smells like burnt electronics, or has a visibly swollen case. These failures do happen — but they’re genuinely rare in the field. Most “dead” systems are dirty panels, loose MC4s, or wrong battery type settings.
If you do need a replacement, a new Renogy 200W panel runs around $250 and ships to most towns with an Amazon hub within a day or two. Replacement MPPT controllers run $150 to $400 depending on capacity and brand. I’m apparently a Renogy person and their MPPT line works reliably for me while off-brand generic controllers never quite behave the same way twice.
Controller failure is more survivable than panel failure — you can limp forward on a single small panel with a basic PWM unit while you wait for a replacement to arrive. Panels almost never fail suddenly. Controllers occasionally do.
So, without further ado, for future trips: consider carrying a 50W backup panel and a spare PWM controller. Under $150 total for the pair. That’s what makes redundancy endearing to us overlanders — it’s not paranoia, it’s just cheap peace of mind when sourcing parts could cost you three days of expedition time.


Stay in the loop
Get the latest trail owl updates delivered to your inbox.